Last Updated on 17/08/2022
This tutorial will show you how to easily create a Spring Boot Hello World and explain a few concepts about this simple and productive tool.
Why Spring Boot?
The Spring ecosystem has become very large over the years, making it possible to to use dependency injection, create RESTful API’s, process batch jobs with database access and more, much more. However, the initial setup and sometimes the maintenance of such projects would be a bit messy with a considerable amount of different frameworks coexisting with each other.
Moreover, monolithic applications most of the time can only escalate as a whole, but not just their most frequently used features in order to improve computational resources usage.
Spring Boot comes to solve all of these problems, providing production ready stand-alone applications and convention over configuration settings, to let you start coding what really matters as fast as possible: your business logic.
Now that you know how important Spring Boot is, let’s go to the tutorial.
Pre-requisites
- Spring Tool Suite (STS) – click here to follow to tutorial.
Create Spring Starter Project
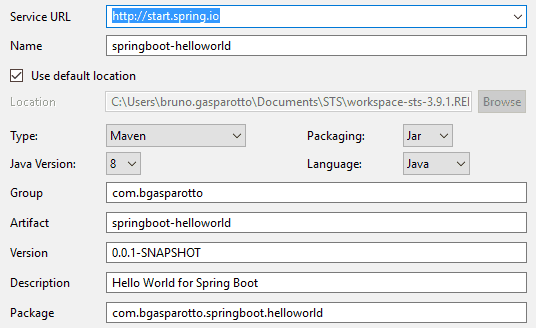
On your IDE (Eclipse with the STS plugin or the stand-alone STS), click on File > New > Spring Starter Project. On the next screen, you may leave the settings at their default values and click on Next. However, I’ve changed some fields to give my new project some identity:
Now, in order to provide database access, a Tomcat container and RESTful capabilities. select the JPA, Web and Rest Repositories dependencies. Use the search feature to help finding the dependencies:

Last, click on Finish and wait until Maven downloads all the dependencies and build the project.
Database
We are going to use the H2 in memory database for the sake of simplicity, but it can be easily replaced by any relational database like MySQL, Postgres, etc.
JPA Entity
Create a JPA entity called Person in the com.bgasparotto.springboot.helloworld.model package:
package com.bgasparotto.springboot.helloworld.model;

import javax.persistence.*;

@Entity
public class Person {

	@Id
	@GeneratedValue(strategy = GenerationType.IDENTITY)
	private Long id;

	private String firstName;
	private String lastName;

	// Getters and setters
}
JPA Repository
Create an interface for the JPA repository called PersonRepository in the com.bgasparotto.springboot.helloworld.persistence package:
package com.bgasparotto.springboot.helloworld.persistence;

import org.springframework.data.jpa.repository.JpaRepository;
import com.bgasparotto.springboot.helloworld.model.Person;

@Repository
public interface PersonRepository extends JpaRepository<Person, Long> {

}
H2 Dependency
Add the H2 dependency in your pom.xml located at the root of your project:
<dependencies>
	...
	<dependency>
		<groupId>com.h2database</groupId>
		<artifactId>h2</artifactId>
	</dependency>
</dependencies>
Initial database load
In order to pre-load our database upon startup, create a data.sql file in src/main/resources:
INSERT INTO person
(id, first_name, last_name)
VALUES
(999999, 'Admin', 'Admin'),
(1, 'Bruno', 'Gasparotto'),
(2, 'John', 'Lewis');
Business Logic
Just for demonstration and code organisation, let’s create a class with business logic in it. That said, all we are going to do is just filter the persons’ list to remove the “Admin” before returning it to the client.
Service Contract
Now, create the PersonService interface in the com.bgasparotto.springboot.helloworld.service package:
package com.bgasparotto.springboot.helloworld.service;

import java.util.List;
import com.bgasparotto.springboot.helloworld.model.Person;

public interface PersonService {

	List<Person> findAll();
}
Service Implementation
Then, the implementing PersonServiceImpl class into the same package, which calls the repository, run the business logic and return to the client:
package com.bgasparotto.springboot.helloworld.service;

import java.util.List;

import org.springframework.beans.factory.annotation.Autowired;
import org.springframework.stereotype.Service;

import com.bgasparotto.springboot.helloworld.model.Person;
import com.bgasparotto.springboot.helloworld.persistence.PersonRepository;

@Service
public class PersonServiceImpl implements PersonService {

	@Autowired
	private PersonRepository repository;

	@Override
	public List<Person> findAll() {
		List<Person> persons = repository.findAll();
		persons.removeIf(p -> p.getId() == 999999);

		return persons;
	}
}
REST
Finally, let’s create our RESTful controller called PersonController in the com.bgasparotto.springboot.helloworld.web package:
package com.bgasparotto.springboot.helloworld.web;

import java.util.List;

import org.springframework.beans.factory.annotation.Autowired;
import org.springframework.web.bind.annotation.GetMapping;
import org.springframework.web.bind.annotation.RequestMapping;
import org.springframework.web.bind.annotation.RestController;

import com.bgasparotto.springboot.helloworld.model.Person;
import com.bgasparotto.springboot.helloworld.service.PersonService;

@RestController
@RequestMapping("/persons")
public class PersonController {

	@Autowired
	private PersonService service;

	@GetMapping
	public List<Person> findAll() {
		return service.findAll();
	}
}
Run It!
You might have noticed the Boot Dashboard view in your IDE, which lists and controls your Spring Boot projects. This way, find your project on that list, select it and click on the (Re)start button:

After that, the initialisation log is going to be printed, wait until it tells you the Tomcat is available at port 8080:
  .   ____          _            __ _ _
 /\\ / ___'_ __ _ _(_)_ __  __ _ \ \ \ \
( ( )\___ | '_ | '_| | '_ \/ _` | \ \ \ \
 \\/  ___)| |_)| | | | | || (_| |  ) ) ) )
  '  |____| .__|_| |_|_| |_\__, | / / / /
 =========|_|==============|___/=/_/_/_/
 :: Spring Boot ::        (v1.5.9.RELEASE)

2017-12-04 22:01:41.863  INFO 8420 --- [           main] c.b.s.h.SpringbootHelloworldApplication  : Starting SpringbootHelloworldApplication on INV007040 with PID 8420...
2017-12-04 22:01:41.865  INFO 8420 --- [           main] c.b.s.h.SpringbootHelloworldApplication  : No active profile set, falling back to default profiles: default
...
2017-12-04 22:01:46.324  INFO 8420 --- [           main] s.b.c.e.t.TomcatEmbeddedServletContainer : Tomcat started on port(s): 8080 (http)
2017-12-04 22:01:46.330  INFO 8420 --- [           main] c.b.s.h.SpringbootHelloworldApplication  : Started SpringbootHelloworldApplication in 4.675 seconds (JVM running for 5.296)
Last, go to http://localhost:8080/persons and you should be able to see the JSON result of the application:

Additionally, please refer to the GitHub repository for the full version of this code.
I hope it helps.
Cya!