Last Updated on 11/11/2020
This tutorial will show how to install Java 8 on Windows and Ubuntu and the needed environment variables setup for application development.
Windows
Installation
Visit this link to download the appropriate JDK for your Windows (32 or 64 bits), accepting Oracle’s licence agreement.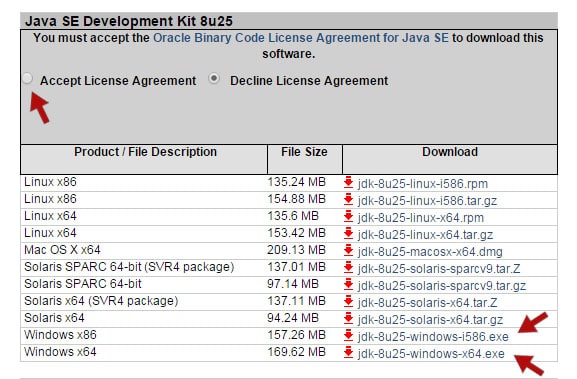
Run the newly downloaded installer and proceed with the installation, accepting the licence terms and advancing the installation steps to complete the process, without additional settings.
Environment Variables
Open the environment variables settings window by pressing Windows + Pause/Break or through Control Panel -> System -> Advanced system settings -> Environment Variables.
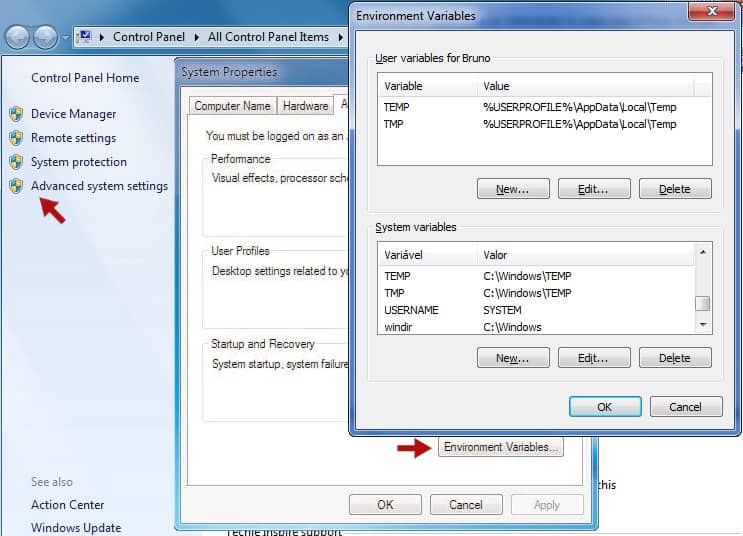
Click on New… button on System environment variables and add the three following variables.
| Variable name | Variable value |
|---|---|
| JAVA_HOME | JDK installation path, example: C:\Program Files\Java\jdk1.8.0_20 |
| CLASSPATH | . (just a dot) |
| PATH | It may already exists on your system under the name Path, so edit its value by adding at the end: %JAVA_HOME%\bin; If it not exists already, create a new one with the value %JAVA_HOME%\bin; |
Validating
In order to validate the Java installation and variables setup, open the Command Prompt by clicking the Start Menu and type cmd. Type the following commands in the prompt, which should print the version information if Java has been configured correctly.
C:\Users\Bruno>java -version
java version "1.8.0_25"
Java(TM) SE Runtime Environment (build 1.8.0_25-b17)
Java HotSpot(TM) 64-Bit Server VM (build 25.25-b02, mixed mode)
C:\Users\Bruno>javac -version
javac 1.8.0_25
Ubuntu
Installation
In Ubuntu terminal, add the repository where Java installation packages can be found:
sudo add-apt-repository ppa:webupd8team/java
Update the packages list with the newly added repository and install Java:
sudo apt-get update
sudo apt-get install oracle-java8-installer
During the installation process, you must confirm the Java download then accept the licence agreement. After the confirmations, wait until the installation is complete.
Environment Variables and Validation
The installation through the above steps often automatically performs the necessary settings for Java development on Ubuntu, then let’s validate the installation with the following commands:
java -version
java version "1.8.0_25"
Java(TM) SE Runtime Environment (build 1.8.0_25-b17)
Java HotSpot(TM) 64-Bit Server VM (build 25.25-b02, mixed mode)
javac -version
javac 1.8.0_25
Hope it helps. Cya!
Good guide on installing java on windows it worked man.
Pingback: Add Wildfly to Eclipse - bgasparotto